Cracks in metal can weaken the structure and compromise safety. Whether dealing with automotive parts, industrial equipment, or household items, repairing these cracks is crucial to restoring strength and functionality. MIG welding, known for its precision and efficiency, is a reliable method for fixing cracked metal. This technique is widely used because it creates strong, clean welds with minimal effort.
This guide will walk you through repairing metal cracks using MIG welding, from preparation to finishing.
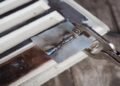
Repairing Cracks in Metal with MIG Welding
MIG welding is a versatile and beginner-friendly method for fixing cracks in metal. It uses continuous wire feed and shielding gas to create strong welds. Before you begin, ensure you have the right tools and materials, including a MIG welder, safety gear, and a suitable filler wire.
The process involves preparing the metal surface, welding the crack, and finishing the weld for durability and appearance. With proper preparation and technique, MIG welding can restore the strength of the metal and extend its lifespan. Let’s break down the steps to achieve a successful repair.
Inspect the Crack
Before starting, thoroughly examine the cracked metal. Check the crack’s size, length, and depth to determine the extent of the damage. Look for signs of additional stress, such as hairline fractures branching out from the main crack. If the metal piece is part of a structure or machinery, ensure no underlying issues, such as fatigue or repeated stress, caused the damage. Proper inspection will help you decide on the right welding technique and materials.
Prepare the Metal
Preparation is key to a successful repair. Start by cleaning the area around the crack. Use a wire brush, angle grinder, or sandpaper to remove rust, paint, grease, or dirt. Contaminants can interfere with the weld’s penetration and cause weak spots.
If the crack is deep, use an angle grinder to create a V-shaped groove along the crack. This groove ensures the filler material fully penetrates and bonds the damaged area. For thin metals, skip this step to avoid burning through. Finally, clamp the metal securely to prevent movement during welding.
Set Up Your MIG Welder
Setting up your equipment correctly ensures strong and clean welds. Choose a filler wire that matches the type of metal you’re repairing. For example:
- Use ER70S-6 wire for mild steel.
- Opt for ER4043 for aluminum.
Select a shielding gas suited to the material. A mix of 75% argon and 25% CO₂ works well for steel. For aluminum, use pure argon gas. Adjust the welder settings, including voltage, amperage, and wire feed speed, based on the thickness of the metal. Your welder’s manual or a settings chart will provide the exact parameters.
Tack Weld the Crack
Before welding the full length of the crack, apply tack welds to hold the metal in place. Tack welds are small, quick welds spaced evenly along the crack. Start at one end of the crack and move to the other, ensuring the metal stays aligned. Tack welds also reduce the risk of distortion or warping caused by heat.
Weld Along the Crack
Now it’s time for the main weld. Begin welding from one end of the crack to the other. Use a steady hand and maintain consistent motion to ensure smooth penetration. A zigzag or circular motion is often helpful for filling the V-groove and creating a strong bond.
If the crack is long, divide the weld into smaller sections. Let each section cool slightly before continuing to prevent overheating and distortion of the metal. Keep an eye on the weld puddle to ensure it flows evenly without burning through the material.
Grind and Smooth the Weld
Inspect the weld for unevenness or excess material once the weld has cooled completely. Use a grinder or flap disc to smooth the surface of the weld. This step improves the appearance and ensures the repaired area is flush with the rest of the metal. Be careful not to grind too much, as you could weaken the weld.
If the repair will be visible, consider sanding the surface further to achieve a polished finish. For added protection, apply paint or a rust-resistant coating to prevent future corrosion.
Test the Repair
The final step is testing the repaired metal. Inspect the area carefully for gaps, weak spots, or signs of incomplete penetration. If necessary, re-weld these areas and smooth them out again.
For structural repairs, test the strength of the weld by applying pressure or loading the repaired piece to ensure it can handle normal use. If the repaired part is part of a machine, reassemble it and conduct a trial run. A properly executed weld will withstand stress and restore the metal to its original strength.
Identifying Cracks Suitable for MIG Welding Repair
Here’s how to determine if MIG welding is a good choice:
Type of Crack
MIG welding best repairs linear cracks, stress cracks, or simple fractures. These cracks occur due to fatigue, impact, or stress over time. However, cracks caused by severe metal fatigue, excessive heat, or chemical corrosion may require additional preparation or alternative repair methods.
Metal Type
MIG welding is ideal for metals like steel, stainless steel, and aluminum. These materials respond well to the continuous wire feed and shielding gas used in MIG welding. However, metals such as cast iron or magnesium may not be suitable for MIG welding due to their brittleness or unique composition.
Crack Location
The location of the crack is critical. Cracks are inaccessible, and flat areas are easier to repair with MIG welding. You’ll need to adjust your technique or consider other welding methods for cracks in tight spaces, corners, or curved surfaces. Also, avoid welding on components under stress or load without first removing them from the assembly.
Crack Size
MIG welding is effective for both small and large cracks, but the size determines the preparation required:
- Small Cracks: Often need minimal preparation, such as cleaning and light grinding.
- Large or Deep Cracks: Additional steps like creating a V-groove for better weld penetration are required.
Condition of the Metal
Ensure the metal around the crack is in good condition. Metal that is heavily corroded, brittle, or overly thin may not be repairable with MIG welding. In such cases, you may need to replace the damaged section entirely.
Cleaning and Preparing the Workpiece
Here’s how to prepare the metal for welding:
Remove Surface Contaminants
Start by cleaning the area around the crack. Use a wire brush or abrasive pad to remove rust, dirt, oil, paint, or other contaminants. These impurities can interfere with the weld and cause MIG weldin defects such as porosity or weak joints. A solvent or degreaser may be necessary for tough contaminants.
Grind the Crack Area
Use an angle grinder or grinder attachment to smooth out the cracked area. For deep cracks, create a V-groove along the length of the crack. This groove helps the weld metal penetrate deeply, ensuring a stronger and more durable bond. Make sure to grind both sides of the crack for the best results.
Check for Other Damage
Examine the workpiece for additional cracks or weaknesses around the repair area. If you find other cracks nearby, clean and prepare those areas. It’s best to address all issues simultaneously to prevent further damage later.
Ensure Proper Fitment
If the crack has caused any displacement in the metal, realign the parts. Clamp the metal securely to prevent movement during welding. Consider tack welding the edges in place before proceeding with the full weld for larger repairs.
Clean Again Before Welding
Once the crack is prepared and cleaned, give the area one final cleaning. Even the smallest contaminants can affect the quality of the weld on metal. Ensure no oils, moisture, or dust might affect the shielding gas or the weld.
Best Welding Techniques for Crack Repairs
Here are the best welding techniques to use for crack repairs:
Stringer Bead Technique
The stringer bead technique works well for shallow cracks or cracks along flat surfaces. This technique involves moving the welding gun straight along the crack without weaving. It produces a narrow, focused weld that minimises heat distortion. Use this technique for smaller, linear cracks where the material doesn’t require much penetration.
Weaving Technique
The weaving technique is highly effective when dealing with larger cracks or deeper grooves. In this technique, you move the welding torch in a side-to-side motion, creating a wider bead. This allows the weld to fill deeper cracks and ensures better heat distribution, reducing the risk of warping. Weaving is also useful for creating smooth, strong welds when repairing cracks along curved or irregular surfaces.
Zigzag Motion
A zigzag motion ensures good penetration and fills in a V-groove or a deeper crack. This technique helps distribute heat evenly across the weld area, minimizing burn-through and stress points. It’s particularly useful for larger cracks or when you need to bridge a gap.
Backstep Technique
The backstep technique is commonly used when welding large cracks in thick material. This method involves welding in short, backward steps, starting from the end of the crack and working toward the beginning. The backstep method minimizes heat buildup, prevents distortion, and ensures the crack is fully sealed. It’s a slow, controlled approach that provides a strong, uniform weld.
Multiple Passes
For deep or wide cracks, you may need to make multiple passes to fill the crack. After completing one pass, let the weld cool, then grind lightly to ensure a smooth surface before applying the next layer. This technique is especially important when welding thicker metals, as it provides more control and reduces the risk of overheating the material.
Post-Weld Finishing for Strength and Durability
Here’s how to finish your welds to achieve the best results:
Inspect the Weld
Before proceeding with any finishing steps, carefully inspect the weld. Look for any signs of incomplete penetration, undercuts, or porosity. Use a magnifying glass or a flashlight to check for tiny cracks or air pockets. If you find any issues, grind and re-weld the affected area to ensure a solid repair.
Grinding and Smoothing
Once the weld has cooled and set, use an angle grinder or flap disc to remove excess weld material and smooth the surface. Start with a coarse grinding disc to level the weld, then switch to a finer disc to achieve a smooth, uniform surface. Grinding the weld bead flush with the surrounding metal ensures the repair blends in with the rest of the workpiece and reduces stress points where future cracks could form.
Check for Cracks and Weak Spots
After grinding, inspect the weld again. Look for any signs of cracks, voids, or weaknesses that may have been hidden beneath the weld bead. If necessary, re-weld the area, ensuring full penetration and strength.
Polishing the Weld
For visible or cosmetic repairs, polishing the weld is essential for a clean, shiny finish. Use a polishing wheel or fine abrasive paper to buff out the weld and surrounding area. This step enhances the repair’s appearance and helps remove any remaining surface contaminants, leaving the metal ready for any protective coatings.
Applying Protective Coatings
Apply a protective coating such as paint, powder coating, or a rust-resistant sealant to protect the weld from corrosion, especially in harsh environments. For steel, use a zinc-rich primer or epoxy paint. For aluminum, a clear coat or anodising may be suitable. Ensure the coating covers the entire repaired area, including the surrounding metal, to provide full protection against moisture, salt, or chemicals.
Conclusion
When done correctly, MIG welding is an effective method for repairing metal cracks. You ensure a strong, durable repair by identifying suitable cracks, preparing the workpiece, using the right welding technique, and finishing the weld properly. The process restores the metal’s strength and functionality, making it a reliable solution for various metal types and crack sizes. Careful preparation and post-weld finishing are key to achieving a successful repair that lasts.


